Self Hosted
The installation process listed below is from running this lab on my own Linux laptop with Pop_OS (Ubuntu base). You may have to alter some of the commands to get gns3 installed/started, but after that we’ll only be working with the gns3 UI.
install gns3
set permissions for packet tracer (Linux)
download the FRR image
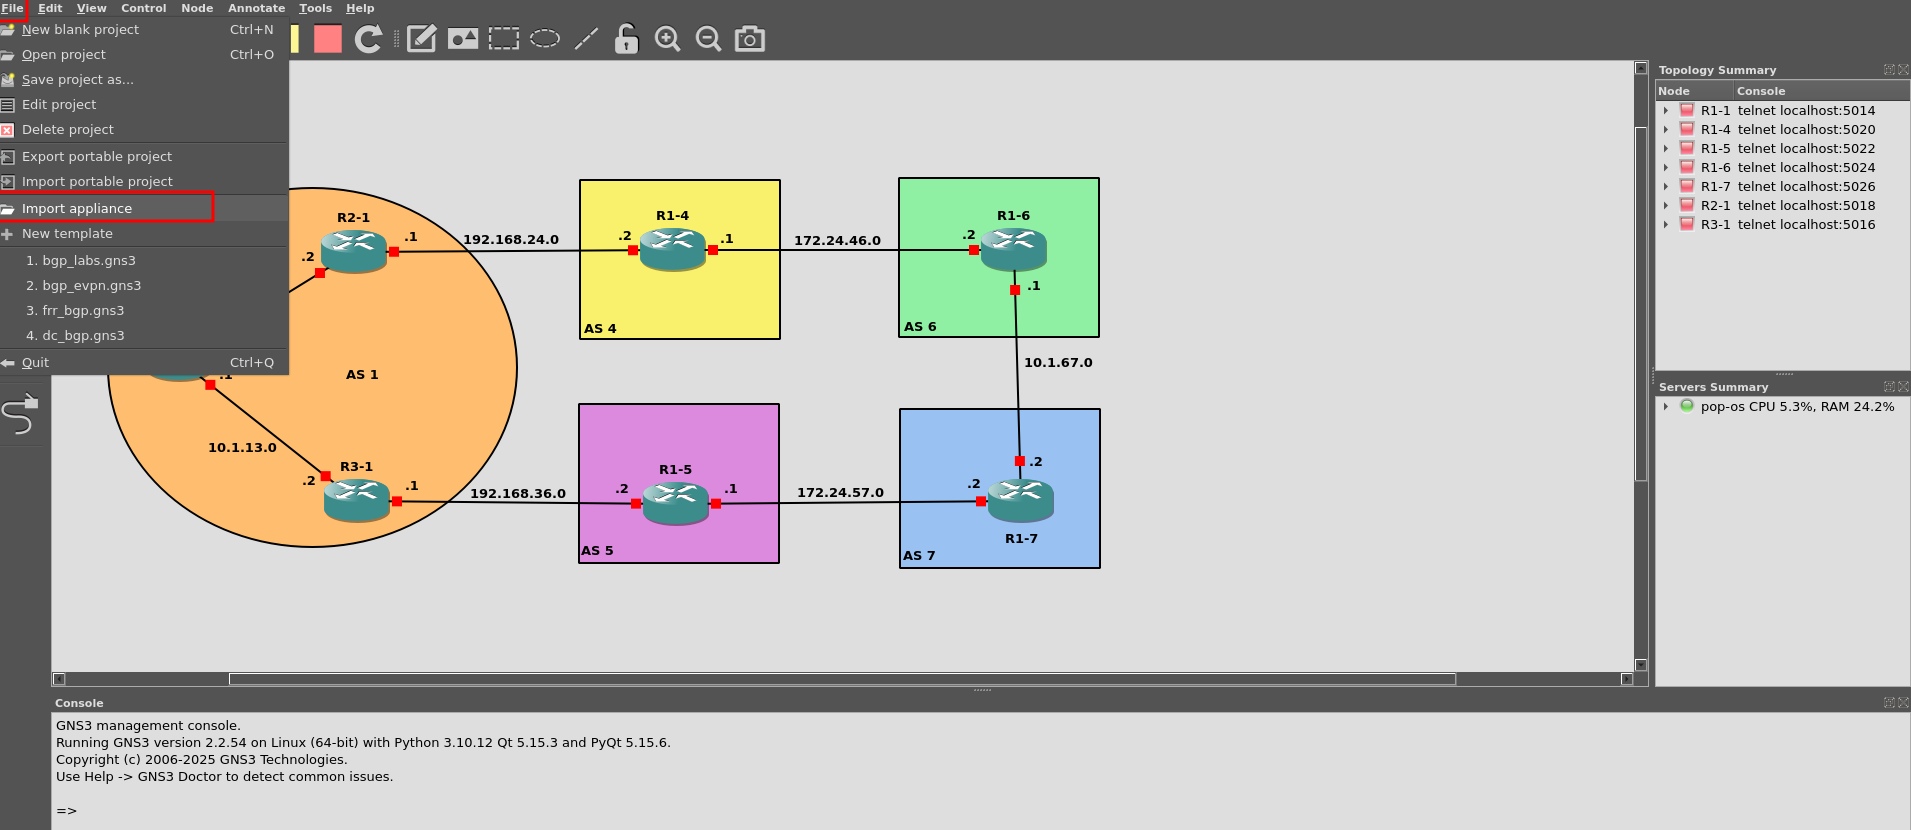
You’ll now need to add the image as an applicance from the UI.
Configurations provided in the hosted lab. You’ll need to add these configurations to the routers based on name below. This will catch you up to users of the hosted lab.
Please see next section for starting routers and accessing their console.
##R1-1
enable
config t
hostname R1-1
frr defaults datacenter
int eth0
ip address 10.1.12.0/31
int eth1
ip address 10.1.13.0/31
no shut
int lo
ip address 1.1.1.1/32
no shut
router bgp 1
no bgp ebgp-requires-policy
bgp router-id 1.1.1.1
neighbor 10.1.12.2 remote-as 1
neighbor 10.1.12.2 route-reflector-client
network 1.1.1.1 mask 255.255.255.255
do wr mem
##R2-1
enable
config t
hostname R2-1
frr defaults datacenter
int eth0
ip address 10.1.12.1/31
int eth1
ip address 192.168.24.0/31
no shut
int lo
ip address 1.1.1.2/32
no shut
router bgp 1
no bgp ebgp-requires-policy
bgp router-id 1.1.1.2
neighbor 10.1.12.0 remote-as 1
neighbor 192.168.24.1 remote-as 4
network 10.1.12.0/31
do wr mem
##R3-1
enable
config t
hostname R3-1
frr defaults datacenter
int eth0
ip address 10.1.13.1/31
desc link to R1-1
int eth1
ip address 192.168.36.0/31
desc link to R1-5
no shut
int lo
ip address 1.1.1.3/32
no shut
do wr mem
##R1-4
enable
config t
hostname R1-4
frr defaults datacenter
int eth0
ip address 192.168.24.1/31
desc link to R2-1
int eth1
ip address 172.2.46.0/31
desc link to R1-6
no shut
int lo
ip address 4.4.4.4/32
desc local loopback
no shut
router bgp 4
no bgp ebgp-requires-policy
bgp router-id 4.4.4.4
neighbor 192.168.24.0 remote-as 1
neighbor 172.24.46.1 remote-as 6
address-family ipv4 unicast
redistribute connected
do wr mem
##R1-5
enable
config t
hostname R1-5
frr defaults datacenter
int eth0
ip address 192.168.35.1/31
desc link to R3-1
no shut
int eth1
no shut
ip address 172.24.57.0/31
no shut
int lo
ip address 5.5.5.5/32
no shut
#remove below##############
router bgp 5
no bgp ebgp-requires-policy
bgp router-id 5.5.5.5
neighbor 192.168.35.0 remote-as 1
neighbor 172.24.57.1 remote-as 7
address-family ipv4 unicast
redistribute connected
###########################
do wr mem
##R1-6
enable
config t
hostname R1-6
frr defaults datacenter
int eth0
ip address 172.24.46.1/31
desc link to R1-4
no shut
int eth1
ip address 10.1.67.0/31
desc link to R1-7
no shut
int lo
ip address 6.6.6.6/32
no shut
## remove below ###############
ip route 6.6.6.0/24 null0
router bgp 6
no bgp ebgp-requires-policy
bgp router-id 6.6.6.6
neighbor 172.24.46.1 remote-as 4
neighbor 10.1.67.1 remote-as 7
network 6.6.6.0 mask 255.255.255.0
###################################
do wr mem
##R1-7
enable
config t
hostname R1-7
frr defaults datacenter
int eth0
ip address 172.24.57.1/31
desc link to R1-5
no shut
int eth1
ip address 10.1.67.1/31
desc link to R1-6
no shut
int lo
ip address 7.7.7.7/32
no shut
## remove below#########################
ip route 7.7.7.0/24 null0
router bgp 7
no bgp ebgp-requires-policy
bgp router-id 7.7.7.7
neighbor 172.24.57.1 remote-as 5
neighbor 10.1.67.1 remote-as 6
network 7.7.7.0 mask 255.255.255.0
#######################################
do wr mem
With these configurations now in place, you are ready to begin the lab. All routers should have all interfaces assigned now and even a few are set up to form BGP peers.